EPLAN.HOUSE
In theory, ceilings, walls, slopes of door and window openings, and any other surfaces finished with plasterboard sheets are being spackled in the same way as plastered surfaces, but there are several nuances:
- If the plasterboard sheets are even, then it is not necessary to continuously spackle them.
It is enough to spackle the joints and fastening points of the sheet with self-tapping screws. For filling with the first layer of holes from self-tapping screws and longitudinal joints, you can use a starting spackle or a special spackling paste for sealing joints. You can buy any, even if it's ready-to-use, as long as the packaging indicates that this paste is for drywall joints. However, dry mixes are more reliable. Spackle the joints and screws 2-4 times (The more flatter the surface will be).
- Use fiberglass tape for sealing joints in one plane:
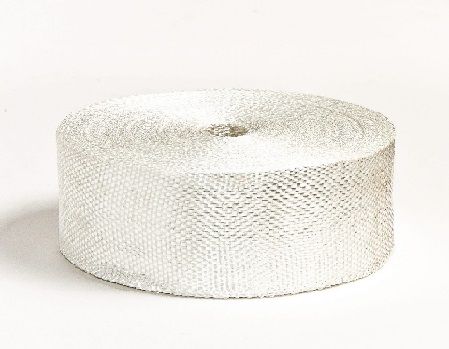
Prepare the transverse (non-profiled) joints before gluing the fiberglass tape: cut the cardboard to the width of the tape + 1.0-2.0 cm. the net will keep the loose pieces of putty and prevent them from crumbling. But if the frame for the gypsum plasterboard was made incorrectly or you have wooden floors, or you live in apartments with cheerful neighbors who often host parties above, then no grid will save you.
When sealing transverse joints, after removing the cardboard, it is better to treat the gypsum with glue or spackling paste, and then press the tape into the spackle and remove the excess paste with a wide spatula.
Sticking fiberglass tape is optional:
- If you are going to paste over the surface with wallpaper;
- When sealing profiled (longitudinal) joints, I have never seen cracks at longitudinal joints. But on the transverse and the longitudinal non-profiled joints, the appearance of damages during the filling is a fairly frequent occurrence.
3. Use metal (usually aluminum) or plastic perforated corner for sealing the joints of two drywall sheets at an angle of 75-105º.
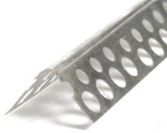
or fiberglass tape. If the angle is smaller or higher, you can only use tape. Use a special perforated corner to seal the joints of curved surfaces. Corner attachment or fiberglass tape sticking is not necessary in the cases indicated for longitudinal joints.
Plasterboard joint spackle:
- Spackling of longitudinal joints.
- Before gluing the tape, it is advisable to prime the surfaces of the joints. Typically, the tape is self-adhesive and can be glued directly to the cardboard on the longitudinal joints:

In the figure, the fiberglass tape is indicated in red and the spackle in blue.
- Also, the tape can be glued to waterproof glue or paste. It can be more convenient. The main thing is that the mesh is not below the ceiling mark or protrudes beyond the wall surface. It is most suitable to spackle with a wide spatula. The spatula's width should be 5-10 cm more than the width of the joint (highlighted in blue), the spackle is applied along the joint.
2. Spackling of transverse joints.
I must say right away that it is only possible to ideally spackle the transverse joints only when the entire surface is being spackled in a continuous layer, but at the same time, there is a risk of cracks. Drywall draws in water from the paste and swells a little, and when the paste dries, the drywall sheets shrink, and cracks may appear. In general, when plastering for painting transverse and longitudinal non-profiled joints, a tape sticking is required:
- Cut the cardboard with a wallpaper knife to the right and left of the seam;
- Remove the cardboard with a chisel (you must sink the heads of the self-tapping screws in advance).
- After you remove the cardboard, you can glue the tape. Of course, it is possible to stick the tape on top and not cut the cardboard, but only if you have puttied the surface continuously:
Option 1. Sealing the joint without tape.

Option 2. Sealing With cutting and removing cardboard.

Option 3. Solid putty without cardboard cutting.

3. Spackling of corner joints.
Attach a perforated corner to the corner joints, which at the same time serves as a control joint and dramatically facilitates the filling process. The corner is glued to spackling paste; for reliability, it is advisable to secure the corner with masking tape until the glue or paste is dry. Sometimes the corner is shot with a stapler, but the drywall's staples do not hold well. If you have joined the drywall's profiled edges, then there is no need to cut cardboard under the aluminum corner, but you may have to do it under the plastic one since the shelf's thickness at the plastic corner together with a control joint reaches 2.5-3 mm. We set out details of the finishing of the corner joints separately.