EPLAN.HOUSE
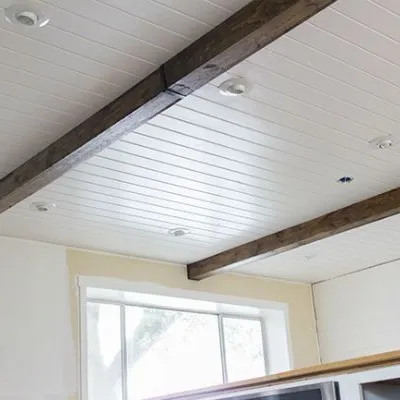
Only with drywall help can you quickly, efficiently, and inexpensively implement any design solutions: multilevel, creating arches, vaults, faux beams, etc. But all this will be after, first let's figure out how to make a simple ceiling.
Work process
- Markup.
Usually, to beat off the level - put marks on the walls at the same height as sea level - use level or theodolite (for huge rooms). You can also use a regular building level depends on your capabilities and skills. How to use these or those measuring devices is described separately.
If there is no water level at hand, then you can easily and quickly make it yourself. It is enough to have two medical syringes for 10-20 cm3 and a 5-10 m long flexible hose for doing this. It should be transparent, but you can use any rubber one. The most crucial part is that the hose has to fit tightly on the syringes. After the hose is pulled over the needles, pour the water into the hose and syringes. The result is a water level with marks and caps, similar to those you can find in store. To prevent water from spilling out during marking, insert plungers into the syringes when moving the level.
The markings can be done at any height convenient for you, and then, after measurements, you can transfer the marks can to the required height. The required ceiling height is either already set by the designer or determined locally, taking into account the following factors:
- Use a building level or a rope (if the room is very large) to find the ceiling's lowest point. It is often the middle of the ceiling because any structure lying on the supports bends according to resistance laws. Wooden floors and reinforced concrete floors have the highest bend. The height difference can exceed 10 cm. The maximum height of the suspended ceiling, in this case, is the distance from the floor to the lowest point of the existing ceiling (of course, if you do not have sagging floors) minus the height of the metal profile (2.5 cm) or the height of the timber (if you have a wooden frame) and minus the thickness of the drywall sheet (9.5 mm). To avoid unpleasant openings in the future, make the ceiling 1 cm lower.
- If you use recessed lights, the ceiling can drop even lower. In this case, the height of the suspended ceiling depends on the luminaires' technical data, so carefully read the instructions for the luminaires. Accordingly, it is advisable to buy lamps before you start making a suspended ceiling.
Beat off the level with any pencil or marker at the height of the top of the drywall sheet. With such a markup, it is convenient to mount the frame elements.
- Installation of the Furring Channel (UD or guide profile) around the perimeter.
- Attach the profile to the walls so that the bottom of the profile is at the level you marked. You can attach the furring channel using dowels and "yellow" screws for quick installation, sold in the kit, but you can connect the furring channel to wooden and adobe walls with ordinary "black" screws.
- Drill holes with a diameter of 7 mm in the profile every 40-50 cm (if there were already holes in the furring channel, it is better to drill them out so that the dowels do not deteriorate during driving). (1)
- Attach the furring channel to the wall so that the bottom of the profile is at the height of the level you beat off (2).
- Using a pencil or marker, draw the outlines of the drilled holes on the wall (if you have skills, you can immediately drill the holes without additional marking).
- Use a punch or drill in punch mode to drill holes in the wall (3).
- Attach the furring channel to the wall with dowels and screws for quick installation or with ordinary dowels and self-tapping screws. It is at your discretion (4).
- If the wall is very curved, then the furring channel bends during attachment and goes in waves at the attachment points. To remove waves, cut the furring channel at the top and bottom with metal scissors.
Visually, it looks somewhat like this:

- Installation of the mainframe from the C-shaped furring channel (CD or ceiling profile).
- Here a slight deviation to the area of strength of materials theory is required. The C-shaped furring channel or C-channel supports the beam (in our case, the drywall). Any beam resting on supports will sag. The amount of deflection depends on the load and the distance between the supports. In our case, the load is constant - the weight of the drywall. Therefore, to reduce the sheet's deflection, it is necessary to make a smaller distance between the supports - the CD profiles. For the edges of the beam not to bend, they must be on the supports.
Translated into ordinary language, this means that you should parallel mount the C-channel. Ensure that channels are present both along the longitudinal and transversal edges of the sheet. Otherwise, the ceiling at the joints will crack. The more furring strips you install between the extreme ones, the smoother the ceiling will be.
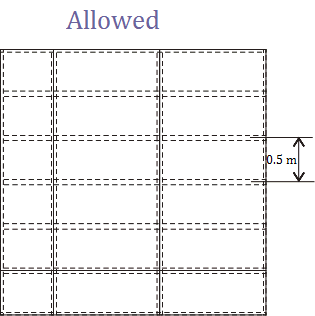
Almost always, you have to install one channel between the edges. With a standard sheet width of 1.2 m, the distance between the supports will be 0.6 m. In this case, the ceiling, of course, will not collapse, but it will not be even. The maximum allowed distance between the channels is 0.5 m (20 inches). The sheets must be fixed perpendicular to the furring strips, and, accordingly, the consumption of C-channels at longitudinal joints increases. I recommend the 0.4 m (16 inches) strip spacing - in this case. The C-channel consumption is the same (or slightly more) as at a distance of 0.5 m, since the number of additional furring strips at the joints decreases, also, at a distance of 0.5 m, labor costs for installing additional C-channel for joints are two times more than for the installation of the main channels. At the same time, ceiling furring strips can withstand a reasonably large load and give a relatively small deflection.
Possible furring strips mounting schemes (for a room of 3x3 m):
:")

If you believe the pictures, you can quickly determine the CD channels' location, but you do not believe them. Ancient Greek geometers and, in particular, Euclid, tried in vain. Their knowledge never reached ordinary builders in the sense that there are no rectangular rooms in typical houses. And they are at best in the form of a parallelogram, truncated trapezoid or rhombus, and at worst and most common in the form of an irregular quadrangle. It means that you will have to cut the first sheet of drywall, and it is advisable to do this before you mount the frame.
- Attach the sheet to the UD channel in the corner, where you will start the installation
- Cut the sheet so that both the longitudinal and transverse edges of the sheet are adjacent to the corner.
- Use a level or plumb line to mark the edges of the sheet on the old ceiling.
- Draw a line along with the received marks. This line is the middle of the profile, along which you will install the profile fasteners.
- Depending on the scheme you have chosen, mark up the ceiling.
- The distance from the edge of the wall to the first profile (middle or axis of the profile) depends on the selected installation scheme. If the walls are even and the room is rectangular, then it is 40 or 50 cm.
Tip: make the frame in stages. First, set up the C-channels for the first sheet or row of drywall sheets. Since the walls are rarely flat and the corners of the rooms are straight, the first drywall sheet or the first row of sheets you may have to cut on the spot, and if the walls are very uneven and the corners are not straight, you even have to rearrange the hangers and re-insert the C-channel, the sheet to properly adjoin to the outermost C-channel. After you fasten the first sheet or row of sheets, you can assemble the metal frame to the end. Or you can make the framework at once, but then you stitch the sheets, starting with the second row. In this case, the distance from the wall to the C-channel axis to which you will attach the second sheet was 10-15 cm less than the width of the sheet. If the walls are very uneven and the corners are not straight at all, there may not be enough margin for cutting.
The choice of fixing depends on the distance between the old ceiling and the false ceiling. At a distance of 3 to 10 cm, use U-shaped mounts (simple suspensions), attach the upper part to the old top, and connect the profile to the side ones. You can find U-shaped fasteners in the form of flat strips, so before installation, they do not need to be bent. For long distances, use adjustable buckles with latches (spring hangers), it is more convenient to work with them, but they are much more expensive. The maximum allowed distance between fasteners is 1 m, but I recommend making it 60-80 cm.
Fasten the fasteners using quick fixing plugs or ordinary self-tapping screws (if the ceiling is wooden). Cut the C-channel, so its length is less than the distance between the walls by 0.5 -0.8 cm. If your space between the walls is more than 3 m, use connecting brackets to connect the profiles. Set C-channel to U-channel. For this, the C-channel is not placed perpendicular to the U-channels but slightly obliquely. Installers often screw the C-channels to the U-channels with self-tapping screws. Simultaneously, the head of the self-tapping screw sticks out by a good 5 mm, prevents the sheet from tightly adhering to the U-channel; therefore, the ceiling will already be uneven. If this does not bother you, then go ahead, but it is better to put additional mounts for the C-channel near the U-channel or connect the rivet gun profiles. To determine at what height to mount the C-channel, use the same tools as for marking. It is most convenient to use a harsh thread with a distance of 5-10 m between the walls. Fasten the C-channel to the ceiling mounts (click, screw with self-tapping screws, connect with rivets)
4. Sheet Installation
Everything is simple here: two men are holding and third screws. When working together, it is advisable to use additional supports. Use self-tapping screws and a screwdriver or drill for fastening the sheets.
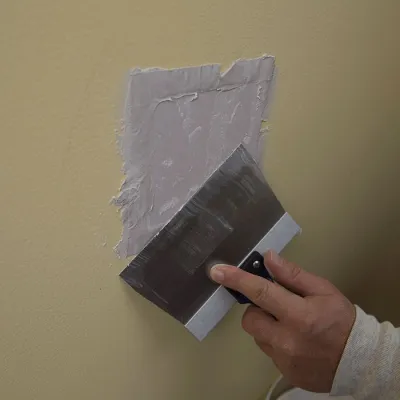
5. Putty.
Putty the drywall ceiling either continuously or only at the joints and screws. It is advisable to stick a reinforcing mesh only at the longitudinal joints, but at the transverse joints, use the painting net if the ceiling is painted.
6. Painting (wallpapering).
Everything is the same here as with ordinary walls and ceilings.