EPLAN.HOUSE
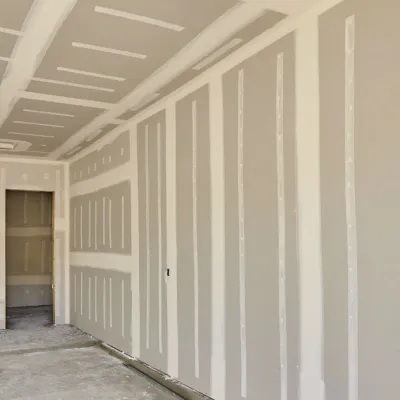
In this article, I will consider the basic rules of installing the wall and ceiling sheathing in the frame house, What fasteners to use for hanging drywall sheets, with what steps and features of fixing in the places of the frame conjugation of structures.
The bitterness of bad quality remains long after the sweetness of low price is forgotten.
Sellers of construction materials are trying to convince you to leave as much money in the cash register as possible, recommending their albums of technical solutions in no way related to the necessary strength and reliability of the house. For example, the other day, I got acquainted with the technical solutions of fibrolite sellers. In this album, for the internal cladding of frame walls, first, it is recommended to attach the sheets of fibreboard with a thickness of 25 mm to the posts or beams of the frame and then attach the sheets of the frame drywall. The question is: why? Both materials are self-sufficient for frame walls and ceiling cladding. You can only use one of these materials, the one you like more. At the same time, a 14 mm thick fibreboard will do its job well.
Sellers of drywall, in turn, recommend installing two layers of drywall sheets and even in chessboard order. Not only will you pay twice as much for the drywall and for the fasteners (nails or screws), but you will also spend three times as much time. Yes, I didn't make a mistake, precisely three times. Because the first layer will be attached to the visible posts and the second to the closed posts. You will need to mark the racks over the first layer of sheathing and cutting sheets of suitable size. You will be wasting time and money.
Do not let yourself be fooled. Learn world experience, recommendations of professional builders, drywall specialists, and construction rules.
Nails or drywall screws
Although disputes over the use of nails or screws to fasten drywall sheets do not stop, both types of fasteners have their advantages.
Drywall screws (self-tapping screws) are indeed more reliable when installed correctly, but since drywall nails are much cheaper and easier to hammer, the battle is far from over. Here are a few things to think about when planning the installation of drywall and a few reasons why the war of nails with screws for drywall will not end soon.
Nails against self-tapping screws for drywall ceiling trim
The ceiling is a place where the self-tapping screws are a clear winner. Additional safety when using self-tapping screws for drywall installation on the ceiling is something you can not do without. With gravity working against them, drywall nails simply can't work as well as their twisting cousins. Luckily for the nails, the ceilings are not the only battleground in the usual repair!
Self-tapping screws and nails for drywall installation on walls
Here the playing field becomes a little more favorable in favor of the nails. With proper use of staples for drywall are as effective as drywall screws for wall mounting. Also, the price and ease of installation you get with nails are a great incentive to choose them. In case of repair, the drywall arrived with nails is easier to remove.
Now, if you go to your local home shopping center, you will find that drywall screws are more expensive than drywall nails. Since building codes may require twice as many nails as the screws for hanging the same piece of drywall, and the screws are twice as expensive as the nails, then you can say that drywall screws are a cheaper option. However, for an efficient and effective screwdriver of drywall screws, it is necessary to use screwdrivers; nails, on the other hand, require only a hammer. If you take the time to check the prices of hammers and screwdrivers, the winner is obvious. If you already have a drywall screwdriver, there are several scenarios in which it is beneficial to use nails for drywall. Purchasing a drywall screwdriver for a small project can significantly increase the installation cost, which would otherwise be more affordable.
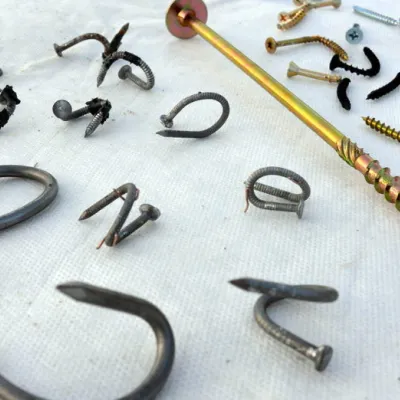
Self-cutter and nail length for drywall
Although there is little room for maneuvering when choosing a self-tapping cut or larger nail, you should not go below the recommended length. When installing 12mm thick drywall, the nails or screws should be at least 32mm long, and the nails should be beveled at the head for better connection to the drywall and to prevent rupture of the cardboard when they are hammered. Drywall 16 mm thick requires a slightly longer 40 mm nail or 38 mm screw. Both nails and self-tapping screws should be coated with an anti-corrosion coating so that subsequent staining of the surfaces does not lead to corrosion, which may protrude through the paint.
How far from each other to place self-tapping screws for drywall?
If you want to start a dispute with a group of drywall professionals, just ask about the distance between the screws. Everyone has their own opinion, and each of these opinions can be correct: there is no single, correct answer for all situations. As for building regulations, official prescriptions of drywall manufacturers and local building regulations sometimes contradict the advice of people who work with drywall every day.
This guide contains the most agreed recommendations on the distance between the screws for drywall with a thickness of 1/2" (12 mm) on the frame elements installed in 16" (400 mm) increments. The use of glue affects the placement of the screws, reducing the total amount required on the drywall sheet.
Distance between drywall screws
Edges: 200 mm o.c.r
Along the edges of the drywall, you need to create a smooth seam to be glued and putty. Smooth, in this case, means that the panels are flush-mounted when one edge of the drywall is at the same level as the adjacent sheet.
When one sheet is larger than the adjacent one, the finishing process at the joining point becomes unrealistically tricky.
Thus, the treatment is usually to place the self-tapping screws tightly at the edges. Does this mean that more self-tapping screws are better? In a sense, yes. But this is only part of the story. A small distance between the screws at the edges can destroy the edge. While finishing can correct randomly chipped or shaved edges, the assembly process should be as perfect as possible to reduce corrections.
Successful installation of screws and nails for drywall
Regardless of what you use, you will need to drown the hat with a nail or screw the self-tapping screw a little deeper than the drywall surface (the hammers have a slightly rounded head to facilitate this task.) You will have a small dimple around the hat; drown the self-tapping screw approximately 1 mm below the drywall surface, creating a small recess. The recesses you will create will later be filled with putty and smoothed out. If you bend a nail on impact, it is usually advisable to add it to the drywall surface instead of pulling it out.
Nail caps for drywall and self-tapping screws should be below the plane of the drywall surface. Try not to tear the paper, as this significantly reduces the retention capacity of the fasteners!
Plasterboard screws spaces in the field
16" (400 mm) o.c.r
The field of drywall is an internal part of the drywall. This is everything but the edges.
The field is considered a more stable area. Both the International Housing Construction Code (IRC) and drywall manufacturers claim that the maximum distance between field screws for drywall mounted on the wall is 16" (400 mm). Some builders like to install more robust fasteners, so they reduce this distance to 12" (300 mm).
Screw spaces when fastening drywall to the ceiling
Horizontal (ceiling) placement creates much more stress for drywall and drywall screws than vertical (wall) arrangement. The entire weight of the sheet is now carried by upside-down screws.
As with any other material, drywall pulls self-tapping screws when moving in an external direction much more manageable than when the load is moved perpendicular to the screws. It is also not necessary that the drywall screws have a conical screw. This cone allows the drywall to be attracted more quickly than when using flat head fasteners.
Edges: 8" (200 mm)
Industry Salesmen in the industry often recommend a step of 8" (200 mm) for fixing the edges, the same as for the edges of the sheets mounted on the walls.
Field: 12" (300mm)
Both the Building Code and the Plasterboard Manufacturers' Association recommend that the distance between the screws in the ceiling field should not exceed 12" (300 mm).
Self-cutter for drywall
Distances between the self-tapping screws, for the most part, determine the scheme. However, for side self-tapping screws, you can try to set the space so that the self-tapping screws on the adjacent panels were located on the same post. This reduces the possibility that at the same point may be two crushed edges of the drywall.
Field self-tapping screws do not benefit from defeat. This is your choice as to whether you will stun them or keep them moving even with each other. Some professionals believe that stepped field screws help distribute the weight better. Other professionals believe that aligning the self-tapping field screws into rows structurally works better because it simulates the effect of having a frame in this position.
When using adhesive, reduce the spacing.
Construction adhesive such as Liquid Nails can be used on racks and beams in combination with drywall screws. Applying sealant to a frame or beam before screwing a sheet of paper boosts the strength between the panels and the elements exponentially.
Typically, when using screws and glue, the screws can be placed twice the distance, compared only to the screws. This is not recommended for beginners because if you have no experience with drywall, there is a high probability that you may need to adjust the location of the sheet or even reinstall it. Once the glue ties the panel to the beam or rack, it cannot be removed without damaging the drywall, and then you will need a complete replacement.
Proper edge support
Framing in the inner corners of the walls is often inadequate or absent, making it impossible to fix the edge of the drywall (left). The solution is to inspect the frame before starting to hang the drywall. Make sure that there are at least 25mm open racks in the corners. If not, add another 50x100mm board by nailing it to an existing frame (right).
Especially carefully check the lags laid along the top of the walls. If there is no lag in this place, then usually between the neighboring lags running along the border, nail blocks from the board scrap, the same section as the lag. If you need to add blocks and there is not enough space to swing a hammer, screw the self-tapping screws into the block at an angle from below.