EPLAN.HOUSE
As a rule, window blocks are manufactured in factories and are installed in prepared window openings during the construction of the house. But sometimes, there is a need to make window units with your own hands, save money, or just because you like to do everything with your own hands. Making windows with your own hands is especially beneficial to those who have built a frame house themselves - you can use the same tools and possibly leftover lumber.
After studying the drawings, make a specification of parts with the dimensions in the clearance and workpiece. Then, according to the dimensions given in the drawings, sawn blanks for the parts of windows and boxes by hand saws, electric saws, or on universal machines. After sawing, the blanks are planed with a planer, planer, or milled with electric, planer, straightedge, or combined machines.
Then, the planks' rectangularity and quality of processing are checked, and then they proceed to their marking.
Markup
The bars are marked with a meter, a ruler, a drunk, a malky, an angle, as well as a marking board, Pavlikhin.
Spikes are marked with a template similar to that shown in Fig. 6. г.
Bars are marked on the measuring table with a lid size of 2200 x 1600 mm (100-150 mm longer than the maximum length of the box bar).

-
the bottom horizontal bar of the outer box,
molding, -
the upper horizontal bar of the outer frame,
-
top and side joists of the outer frame,
-
the upper horizontal joist of the inner frame,
-
the upper horizontal joist of the inner frame,
-
the bottom horizontal bar of the inner box,
-
the bottom horizontal joist of the outer case,
glass, -
the vertical bar of the internal casement,
sealing gasket. -
pinchweld,
-
the vertical bar of the outer casement sash.
Consider the order of marking the elements of the window unit with separate sashes.
The window unit has outer and inner frames. For example, let's make marking of vertical and horizontal bars of the inner frame. According to the drawing, the vertical bar should have a clear length of 1464 mm, horizontal - 1495 mm.
Allowance for facing parts on both sides with a width of up to 150 mm length up to 1500 mm is given 15 mm when getting parts from blanks and 35 mm - from lumber. Bars cut from lumber, marked as follows: two vertical or horizontal bars placed on the table facing outward, after which the end of the bar measure 18 mm, i.e., allowance for facing, and from his size bar on the length (in net) that would be for vertical bars 1464 and Gorizottalny - 1495 mm.
With the help of an angle, the bar draws a risk or pencil lines on a bar. From the last pencil line, the next allowance for edging of 17 mm (the total allowance for both ends is 35 mm). Then from the edging line, measure out the size equal to the thickness of the studs (in this case 44 mm), and draw the risks.
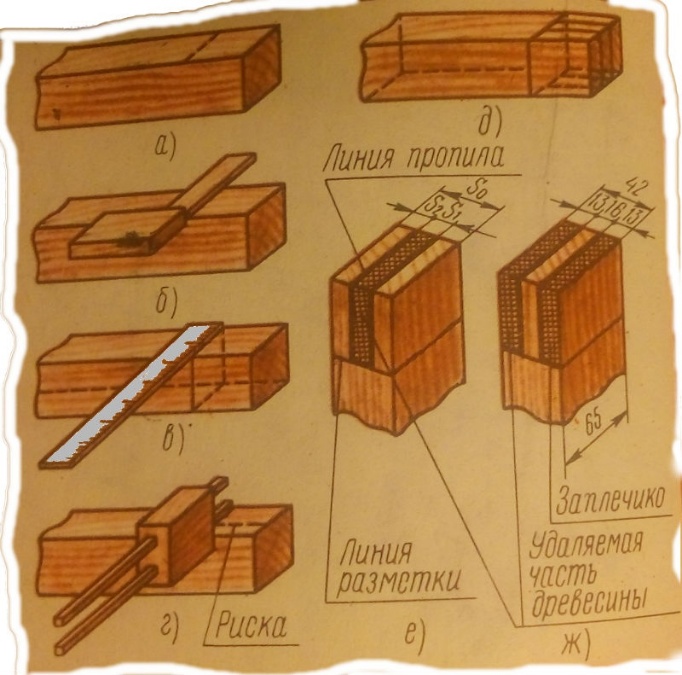
For the selection of a quarter in size 10-13 x, 35 mm marking do as follows: from rib 5 bars on the plate 4 of each bar apply a risk that is separated by 35 mm and on edge 2 - a risk that is separated from the rib at 10 and 13 mm.
Initially, select the quarter size of 10 x 35 mm, and then further remove the bevel and bring the size of a quarter to the required.
Select a quarter can be a hand tool or on the milling machine. After picking, the quarter bars are cleanly cut to the required size.
Marking the frame of the window unit

- box timber,
- the front edge of the bar,
- the line of marking a quarter,
- the front part of the bar plate,
- edge of the timber
Sawing spikes and eyelets
When sawing studs and eyelets, perform the following operations in a strict sequence: mark studs and eyelets saw them, saw out shoulders, and chisel out the eyelets.
Following the drawing size of the connections, and then proceed to the marking. Consider the order of marking the corner end connection to the open through single stud for bars 42 thick and 65 mm wide.
For joint UK-1 S1 = 0,4 S0; S2 = 0,5 (S0 - S1), where S0 - the thickness of the bar, equal to 42 mm. Hence the thickness of the cleat S1 = 0.4 S0 = 0.4 - 42 = 16.8 (rounded to equal 16 mm). S2 = 0.5 (42-16) = 13 mm.
a - marking the height of the stud with a ruler, b - marking the length of the stud with a pencil, c - marking the thickness of the stud with a ruler, d - marking with a ruler, e - marking the end connection, f - eyelet, g - stud.
According to these data are marked out studs; studs and eyes can be marked out using templates, which are used to mark the ends of the bar.
After marking, start working out the studs and eyelets. Sawing is carried out with a circular saw, and the work must be carried out carefully because the skewed stud will skew the sash. If the thorn is thicker than the design size, when landing in the eyelet, it can split a beam, and if the thinner, the connection will be fragile, as the studded connection will be without a tight fit.
When sawing, make sure that the saw passes near the risk; only then you get the exact size of the stud or eyelet. When working out the studs, it is necessary to see only from the ribs' outer side and the eyelets from the inner side.
At the beginning of sawing for fast deepening, the saw is put on the edge at an angle of 15 - 20° and, having made some movements on themselves, without pressing deepen the saw, then saw evenly without pressing and jerks. After the cut, the shoulders are cut off.
The eyelet after sawing is hammered out with a chisel with a mallet.
Elements of the outer box, bindings are marked in the same way.
Window assembly
Assembling window units consists of the following operations: the assembly of window sashes, transoms, flaps on the glue; seasoning of glued sashes, transoms, flaps; the processing of the perimeter; deburring the sags; grooving under the sill; cutting or selection of seats for hinges; fitting flap; hanging on the hinges, setting the sill, slip; assembly of the box; fitting and hanging sashes, transoms in the box.
Shutters, transoms, windows are collected on the workbench. First, the bars are matched, carefully fitting the corners and checking the tightness of joints. Cusps and eyes smeared with glue, and then join the bars in the frame (sash). In the corners of the joints, drill a hole to insert a wooden dowel, pre-lubricated with glue.
Window frames (see figure below) with the driving in their bindings to collect the better two. Bar ends are smeared with glue, assembled, and crimped in the assembly machine design Yerokhin.
Workbench designed by Yerokhin

a - scheme of the organization of the workplace and the assembly of window frames, b - Erokhin's device for a circular saw:
- flaps for stacking (nailing) into boxes;
- metallic gantry;
- screw device;
- box parts
- the place of the carpenters-collectors;
- assembled boxes (blocks);
- blocking bar;
- sawn part (billet);
- frame;
- hinged stopper.
The assembly machine is a metal cradle 2 with a height of 600 mm and 1600 mm. On top of the assembly machine, there is a metal channel. No. 10, on which there is an insertion stop and a screw device.
The presence of a series of holes in the channel with a step of 100 mm allows you to install the stop at the required distance from the screw device 3.
After assembly, check the rectangularity of the box by measuring along the diagonal, drill holes in its corners, and put dowels in them.
Assembled window sashes, transoms, and frames must have on the perimeter allowance for further processing up to 3-4 mm and the thickness of 1 mm for removal of sagging.
Around the perimeter of the sash and transoms are processed after the adhesive sets in the joints of studs. If the product is processed immediately after assembly without dwelling, the glue connection will be broken.
Processing per meter is performed by a planer or electric planer, which first fixes the sash in a vertical position in the workbench. Sash windows, transoms, slats can also be machined on a milling machine in the jigs. Sagging in the plane of the sashes, transoms, slots removed by hand tools (planer, plow), small sags - on the grinders.
After machining around the perimeter of the sash hung on the hinges in the box, and then put the layout, sills, and instrumentation.
Using a workbench equipped with a circular saw fixture (see picture above) to perform these operations.
The device serves for re-sawing layouts and other details at the right angle and is a circular electric saw with a frame 9 made from angles section of 30 x 30 x 4 mm. Frame length of 700 mm one end is attached to a swivel stop 10, which together with the administrative bar 7 is firmly fixed on the workbench. Thanks to the hinge-stopper, frame 9 can be rotated at the desired angle to the thrust bar and locked.
To saw the part, the frame must be set at the desired angle to the thrust bar, then move the part close to it and turn on the circular electric saw.
The labor-intensive operation is the insertion of hinges. To mark the slots, use the Pavlikhin template, a wooden lath 1 with the stop 3 and two brackets 2 with sharpened chamfers. The dimensions of the brackets correspond to the dimensions of the hinges.
.
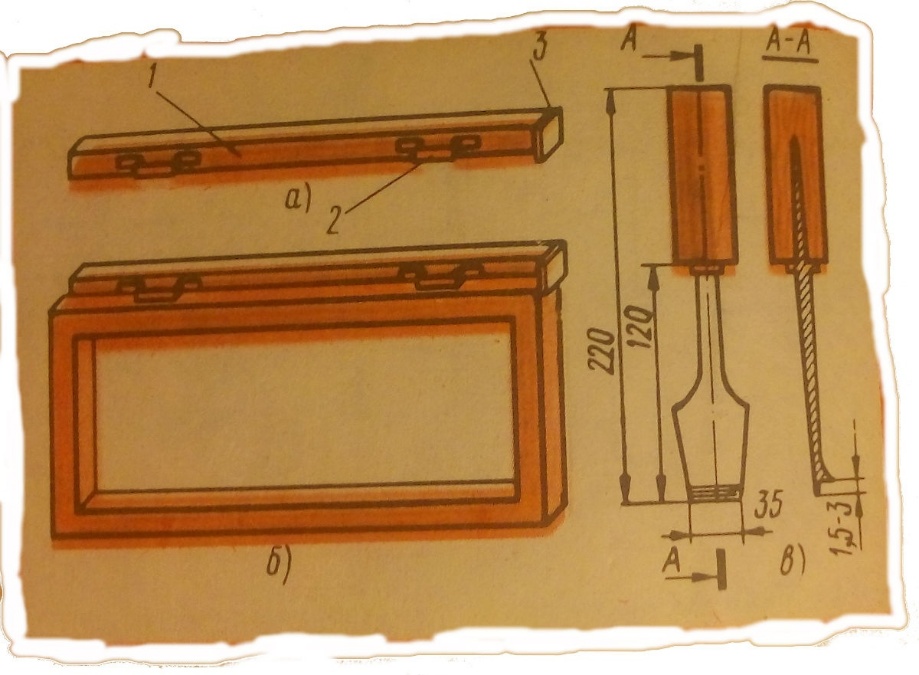
a - template, b - template with a box, c - chisel for selecting slots for window and door hinges:
- rail,
- bracket,
- stop.
When marking, the template is placed on the edge of the sash at the stop, as shown in the figure, and then a light blow with a mallet on the staple transferred its imprint on the sash and by it subsequently select the seat for a hinge. Similarly, make a slot for the hinges. The chisel stop allows you to deepen the blade to a predetermined size. The depth of the hinge socket must match the thickness of the hinge so that after installation, the surface of the hinge is flush with the wood.
The sashes are inserted and hinged into the box on special tables. The process of driving in and hanging window sashes in the box consists of the following basic operations: preparing the sashes, cleaning the hangings, hanging on the hinges, removing possible defects (burrs, irregularities), and painting.
When driving the sashes into the box, first hang the outer sashes. In the manufacture of windows and doors with a fanlight fitting, first, fit the fanlight and then the sashes. The gap between the sashes and the frame shall not be more than 2 mm, which is necessary for covering the sashes with a coat of paint afterward.
When fitting the sashes carefully checked the correctness of the fit, tightness of their adherence to the quarters of the box. Ensure that the hinged sashes open freely and smoothly and do not spring. Internal sashes fit the frame the same way as the outer.
When fitting, make sure that all elements of the window unit are smoothly processed and at the junction (folding) carefully aligned. Glue from the surface of the elements of the unit must be cleaned.
Hinges in the bars of the sash, sash, transoms, and boxes must be flush. Otherwise, the sashes will not close tightly and will spring. Many screws to fasten the hinges to the casements, transoms, transoms, boxes should match the number of holes. Hinges are hammered into the windows at a distance of 200 mm from the quarter box.
Now you can begin installation into the opening.