If you think about it, the basics of the theory of strength of materials are even more straightforward than the multiplication table. The multiplication table is significant and must be memorized like the Lord's Prayer, while the basics of the strength of materials are reduced to a few basic statements. These statements are easy enough to demonstrate, and therefore they are easy to memorize even for absolute "noobs" in the strength of materials.
However, this is my subjective opinion. Many people think that it is challenging to study the strength of materials. There is even a saying: "if you passed the strength of materials, you could get married." Humanitarians and doctors find it easier to read a dozen weighty volumes before a session. People with an analytical mind find it easier to memorize a few introductory provisions of this or that discipline, and they may not even have to remember all the formulas. Most of the formulas can be deduced yourself, using the mathematical apparatus and based on the basic provisions. It's what I did when I was taking my exams.
Circumstances were such that I missed the introductory course of lectures on the strength of materials. As I returned to the college after serving in the Navy two weeks before the session, I had to learn the basics of the strength of materials by myself. The most demanding and most incorruptible teacher on the faculty, who had failed more than a hundred students, gave me an "A." So teachers in other disciplines, seeing an A in the strength of materials, did not dare put a lower mark in their subject, and I ended up with a red diploma.
However, let's not digress and go back to the basics as a noob, like some of you.
In short, the basics of the strength of materials set out in this article are as follows:
Any physical body can be a building structure.
- Any structure has supports.
- Supports provide static balance to the system.
- Forces act on any structure.
- These forces can be external, i.e., acting outside the structure (such forces are called loads) and internal, acting inside the structure (such forces are called stresses).
- However, from the point of view of physics, there is no difference between external and internal forces - we can always replace external forces with internal and internal ones with external ones.
- The main thing is that the static equilibrium of the system is maintained.
The method for determining stresses at various points in a structure is called the section method.
The stresses at any point in the structure must be less than the designed resistance of the structure's material.
That's it, then formulas and other calculations follow, but let's try to add more clarity to these provisions using a beam example.
It is enough to have two simple wooden rulers, say, 6 and 12 inches long, several books, textbooks on the strength of materials are perfect here, and a table to imagine the basics of strength materials. However, plastic or aluminum rulers of any length and books of any other content work too.
1. Types of supports
Now you need to put the ruler flat on two ledges, for example, on two books:
Figure 1

If you look at the ruler from the side, you will see the title of the textbook and that the ruler is lying flat.
1.1 Hinged supports
On the one hand, everything seems to be simple. The ruler lies on the books, well, let it lie. Still, if you look at this situation from the point of view of theoretical mechanics (we have not yet reached the strength of materials), you and I have no ordinary school ruler lying on the books. Still, the model of the beam on two slidings, hinged supports and will look like this:
Figure 2.1

1.1. The rings at the ends of the beam are hinges around which the beam can rotate freely. If we remove, for example, the book on the right, then the left end of the ruler will conditionally remain in place. The right free end of the ruler will fall on the table, i.e., the ruler will turn, and this means that our assumption that the supports are hinges is correct.
1.2. Horizontal lines with oblique shading at the bottom mean some kind of stable base. In this case, it is a table.
1.3. The distance between the base and the supports of the beam, indicated by triangles, is a kind of air cushion and means that the supports can slide on the base without friction.
Sliding hinge supports do not allow the ends of the beam to move only relative to the y-axis, i.e., create only one support link - vertical.
1.4. In fact, our ruler does not have any hinges connecting it to the supports, but the ruler rests if you look very closely, on the protruding spines of books, and you can depict our ruler like this:
Figure 2.2

In the technical literature, such a display of supports (without hinges) is also found and means that the supports do not impede rotation but impede vertical and horizontal movement.
Indeed, if we try to move the ruler to the right or the left, we need to apply a force more significant than the friction force that arises between the ruler and the books due to the action of gravity on the ruler. Thus, the supports shown in Figure 2.2 can be considered as hinged fixed (non-slip) supports. Accordingly, such supports create two support links - vertical and horizontal.
1.5. If you see Figure 2.1, the hinges are at the ends of the beam. In Figure 2.2, the supports' triangles are at some distance from the ends of the beam. There is no difference here from the point of view of theoretical mechanics. If we take the distance between the supports the same, as in Figures 2.1 and 2.2, and no load will act on the ruler's ends outside the supports.
Beam calculated length
It means that the beam's actual length and the beam's calculated length are not the same. The exact beam length is always greater than the computed length, and the calculated beam length is the distance between the supports, in this case, the span between the books. Usually, people measure the beam size along the x-axis.
The calculated length (beam span) is denoted by the letter l.
The ends of the ruler, resting on the books, can be considered as the supporting sections of the beam lsp. Calculation of the support sections of the beam for crushing is a separate large topic, but in this case, we only comprehend the strength material basics, and at this stage, it is enough for us to know that the longer the length of the support sections, the better for the beam, and the real length of the beam are:
lr = l + 2·lsp (1.1)
1.2. Support links of a hinged beam
Any physical body, in this case, a ruler, has three degrees of freedom of movement in the xy plane under consideration:
The body can move along the x-axis.
The body can move along the y-axis.
The body can rotate around some point, even if the freedom of movement to the x and y axes is limited.
Accordingly, any stable and statically definable structure must have at least three support links that limit the indicated degrees of freedom. The beam shown in Figure 2.1 is statically definable but not stable since it only has two parallel vertical braces. The beam shown in Figure 2.2 is stable but statically indeterminate since it has two vertical and two horizontal support links. And the equations of static equilibrium allow you to determine only three unknown variables (more on this later).
Therefore, in the technical literature, the following display of hinged beam supports is often found:
Figure 2.3

Figure 3

then such a ruler can be conventionally considered as a beam clamped on supports, and then the model of the beam will look like this:
Figure 3.1

The physical meaning of such a mapping of support links is as follows:
1. Any single-span statically determined beam (and our beam, I will say right away, is both single-span and statically determined) has two vertical support ties (shown in purple in Figure 2.3) and one horizontal tie (shown in blue in Figure 2.3). In this case, the directions of the bonds do not intersect at one point. Therefore, the beam is stable, and in general, the system of 4 rods is geometrically unchangeable.
2. These connections are pivotally connected with the beam and with a respective rigid base. It, in turn, means that not only can the beam rotate freely relative to the support ties, but the support ties can also rotate freely relative to the rigid base.
3. To ensure the system's geometric immutability (stability), a horizontal support link is necessary, although it does not seem to be needed when calculating the vertical load. This is a separate story.
4. The rods denoting vertical and horizontal ties are a big convention, and they are needed only to replace them with the corresponding support reactions at the first stage of the calculation. Conventionally, these rods are considered infinitely rigid, i.e., the deformation of such rods at any load is zero.
5. Thus, the vertical support link on support B, shown in Figure 2.3, prevents only the beam's vertical movement at point B and corresponds to the sliding pivot support shown in Figure 2.1. Such support at point B is called pivotally movable support.
6. The vertical tie on support A prevents the beam's vertical movement at point A, and the horizontal link prevents the horizontal movement of the beam. Such support at point A is called hinged, fixed support and corresponds to Figure 2.2.
It would seem that such a display of support links is not suitable for our ruler, the ruler does not have any pronounced horizontal link by default (except for friction forces), but it all depends on what tasks are to be solved.
Quite often, beams are calculated for a vertical load acting along the y-axis, while no forces are acting along the x-axis, or their sum is 0. Besides, if the applied horizontal loads are less than the friction forces arising on the support sections beams under the action of a vertical load, then in such cases, the beam diagram shown in Figure 2.3 is quite acceptable for our ruler.
1.3 Rigid pinching on supports
If we load the ends of the line with more books:
The physical meaning of such a display of supports is as follows: rigid embedding prevents not only vertical and horizontal movement of the beam on the support, but also rotation, thus it limits all 6 degrees of freedom of the physical body. Such a support is called rigid pinch.
We can easily verify this if we remove one of the stacks of books. A ruler pinched in another stack will stay in place.
Again, in this case, it is not entirely correct to consider a beam as rigidly pinched if the support sections are short enough, but if the books with a ruler are glued well, and the support sections at the ruler are relatively long, then after the glue dries, the ruler can already be considered as a rigidly clamped beam on supports.
But all the same, most often in the calculations, the version of the supports shown in Figure 2.3 is taken. But reinforced concrete beams, which are concreted at the same time as the walls, or metal beams, rigidly welded or bolted to a very rigid base so that they form, as it were, a single whole, can be considered as beams clamped at the ends.
1.4. Sliding links
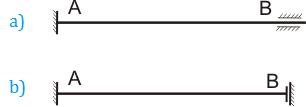
Rigid joints on supports can be not only fixed but also sliding. We can easily make sure of this if we glue one stack of books and push it horizontally in the direction of the ruler, without gluing the second stack of books, or if we glue both stacks and try to raise one pile so that the angle of rotation at the end of the ruler pinched by this stack does not change. In the first case, we will get a rigid joint that slides horizontally, and in the second, vertically. In this case, it is correct to show the support connections as follows:
Figure 3.2. a) joint sliding about the x-axis; b) joint sliding about the y-axis.

That is, we still treat one of the stacks of books glued together as a rigid joint on support A, but the joints on support B are already treated as sliding. Such joints are called slider-pins or rigid joints with one degree of freedom of movement.
But that's not all - a sliding restraint can also have two degrees of freedom of movement, i.e., it does not restrict the translation of the end of the beam in question either vertically or horizontally. The only thing that is restricted is the rotation angle. This type of restraint is called a bidirectional or rigid restraint with two degrees of freedom of movement.
1.5. If we continue the thought and imagine that our ruler is very firmly glued together from separate pieces, then it turns out that we can treat any section of our ruler as an individual beam with a slider-pin at the ends and could depict our beam, not as one beam on two hinged supports, but as 2, 3 or as many beams as you like, of which the outermost beams would have one hinged support and a slider-pin at the second end. All the other beams would have a slider-pin. In this case, there is no need for such a complication of the problem, but often such an assumption allows to solve relatively complex problems.
And for this assumption to be correct, we must dissect our beam very neatly in a plane perpendicular to the x-axis to simplify the problem, and thus we will get as many cross-sections of the beam as we want. Why we need to consider cross-sections, we will find out a little later.
The main difference between hinged and rigid supports is that hinged supports allow the beam to rotate on the support in question, while fixed ones do not.
That's it. No other support options are considered when solving structural design problems: either hinged supports or fixed at the ends. Another thing is that there can be any number of hinged supports for a beam, one end can be pinched, both hinged and rigid supports can be sliding, hinged supports can give settlement and even represent a solid elastic foundation, a beam can have consoles, but these are variants of support types, and location options and combinations of supports. There can be an infinite number of such combinations, but this is not the basis of theoretical mechanics, and we will not consider these variants here.
Now let's find out why we had to make this construction and what it gives us.
2. Loads (external forces).
If you take a closer look at Figure 1, you can see that the ruler is slightly bent in the middle. If you take a longer 12-inch ruler and rest it on books, then the deflection in the middle of the ruler will be even more noticeable but still not very pronounced.
Why did this happen?
It turns out that a load acts on the ruler - the ruler's own weight and under the action of this load, the ruler bends, while we can see the most significant deflection in the middle. Moreover, the greater the distance between the supports - l, the lower the beam's bearing capacity with the same section. It turns out that the calculated length of the beam is an essential factor in the calculations. Since the ruler has a simple parallelepiped shape and the material's density from which the ruler is made is approximately the same, such a load is considered uniformly distributed and is depicted in the design diagrams as follows:
Figure 5

2.1. The distributed load can be uniform, as shown in Figure 5, or unevenly distributed, while the value of the distributed load can vary linearly and not linearly. Also, the distributed load can act not on the entire length of the beam but on one or several sections. If several evenly distributed loads act on the beam, such as dead weight, weight from brickwork resting on the beam, and load from floor slabs, such distributed loads can be summed up, which further dramatically facilitates the calculations. This approach is called the principle of superposition.
2.2. If you have a finger, and I think you have a lot of those, then when you press your finger in the middle of the ruler, the ruler will bend much more noticeably. In this case, in addition to a uniformly distributed load, a concentrated (point) load also acts on the ruler (in Figure 6, the distributed load is not shown):
Figure 6

Of course, point loads can be arbitrarily many and they can be applied anywhere in the beam and not only perpendicular to the beam axis, but also in parallel. If a concentrated load is applied perpendicularly on a support, then this will not affect the beam in any way, it will simply result in a support reaction numerically equal to the load and directed in the opposite direction. You can easily check this yourself by pressing your finger on the ruler at the place of support on one of the books, if you press very hard, you will sooner wash the book, but the ruler will still not bend.
Why is this happening?
It turns out that the load acting on the beam creates a bending moment, i.e. wants to rotate the beam around the supports. In this case, the value of the bending moment directly depends not only on the magnitude of the load, but also on the shoulder of the force action. It is easy to guess that the maximum bending occurs when a concentrated load acts on the beam in the middle.
Of course, this moment acts on the beam for a reason, but in the considered cross-section of the beam and it arises in this case from the action of the support reaction, which still needs to be determined, but this will be discussed further.
Sometimes, in the calculations, the concept of a torque acting on a beam is introduced:
Figure 7

That's all. We will not consider any more variants of loads acting on the beam when solving problems in the calculation of building structures. However, the classification of loads - external forces - is a separate big topic.
And now, let's talk directly about the strength of materials. Because before, we talked about the terms and concepts of theoretical mechanics.
3. Stresses (internal forces).
If you continue to press your finger on the ruler resting on books, as shown in Figure 1, then the ruler will bend more and more until one day it breaks (of course, instead of brute physical force, you can use the power of your intellect, I will not object to it).
Why is this happening?
It turns out that there is a limit to everything. If you apply a lot of pressure, you will overcome the material's resistance limit (in this case, the ruler is wooden).
If, for example, we take a steel strip with the same cross-sectional parameters and the same length as a wooden ruler and also put it on the books and apply the same load to it in the middle, then it is hardly possible to break the steel strip with a finger, at least because the resistance of steel is tens of times greater than that of wood. But back to looking at the wooden ruler.
When you press on the ruler with your finger, the ruler is deformed, the upper part of the ruler is compressed, and, accordingly, normal compressive stresses arise in this area. The lower part of the ruler is stretched, and, consequently, normal tensile stresses occur in this area. These stresses are the reaction of the material to the applied load.
Normal stresses are those directed along the normal (perpendicular) to the considered cross-section of the beam.
In addition to normal stresses, tangential stresses may also occur in the sections in question. The stress states may be linear and planar or volumetric, but not about that now.
The theory of resistance of materials assumes that under this loading act in the middle of the beam's cross-section, the strain is 0. It follows that there are no normal stresses, neither tensile nor compressive, in the middle of the beam's cross-section. Accordingly, the maximum strains occur in the middle of the beam's span at the top and bottom of the cross-section. In this case, the diagrams of normal internal stresses in the cross-sections of the beam will look like this:
Figure 8

The destruction of the structure can begin both at the top and the bottom. Calculation of the structural strength comes down to preventing this very destruction. In other words, the maximum possible stresses should be less than the resistance of the material. In this case:
σ < R (1.2)
But it's not the end of the article, so I hope you haven't broken the ruler yet, because it's time to lean the ruler on the books, not horizontally, but vertically:
Figure 9

It is difficult to break the ruler with your finger and even by your foot in this position. And we just turned the ruler by 90°. Simultaneously, the cross-sectional area of the beam has not changed, the load has not changed, the bending moment has not changed, we have the same wooden ruler.
Why is this happening?
The theory of resistance of materials explains this wonder as follows: when we turned the ruler, the width b of the flat-lying ruler became the height h of the ruler placed on the edge, which means that the calculated moment of inertia, the moment of resistance and, accordingly, the bearing capacity of the beam changed.
In general, this is the essence of the resistance material: the correct determination of the loads acting on the building structure and selecting the optimal element section.
That's all. As you can see, the basics of strength materials are simpler than the multiplication table, and it's just that I described them in too much detail here. The following are the basic formulas that are generally not challenging to deal with using the same ruler's example.


