Gluing gypsum board sheets to walls or ceilings is the fastest and best way to level surfaces. But if the ceiling or walls are very crooked (height difference or deviation from the vertical more than 3 cm), this method may not be suitable. When working with a gypsum board, it is advisable to observe the following simple rules.
You will need the following tools and materials:
- Standard sheets of gypsum board (know the quantity);
- Adhesive for plasterboard (from 2 to 10 kg/m2 depending on the quality of the leveled surface);
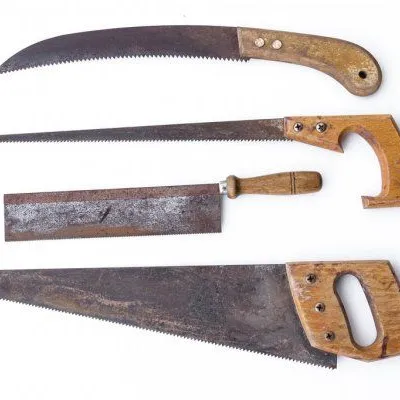
- Knife or electric jigsaw for cutting drywall.
- A standard spatula;
- A deep penetrating primer;
- A mixing pail for mixing mortar;
- Brush or roller for applying primer;
- A level and plumb line, string, or construction cord;
- Chalk, pencil, or marker for marking.
The technology of work performance.
1. Preparation of the surface.
Carry out the work, preferably at a temperature of 15-25°C and 40-70% ambient humidity. Remove old nails, screws, and other fasteners.
If you are going to glue gypsum boards to unplastered brick walls, for additional heat and sound insulation, put cement-sand or gypsum mortar over the unfilled joints of the masonry. To enlarge the room's space, knock down oversized sweats of mortar and knock out too protruding parts of the brick (only for load-bearing walls, not for partitions).
If you're going to glue drywall sheets to plastered surfaces, first make sure the plaster is secure. Tap the surface and remove any loose pieces of plaster. Fill large cracks and knocked out pieces with cement-sand or gypsum mortar.
Before you start, clean the surface of dust, dirt, oil stains, paint, or whitewash. For better adhesion, prime the surface with any deep penetrating primer.
2. Check that the surface to be treated is horizontal or vertical.
Before you make a marking, it is desirable to know the following details:
Glue the sheets vertically on the walls simply because it is more convenient and more manageable. You will be OK with standard sheets of 2.5 m length in a typical house to paste the walls without additional joints. This rule does not work in older homes with ceiling heights between 2.7m and 4.5m, so glue the sheets as you wish. Glue the bottom row of sheets first, again for convenience reasons.
On ceilings, glue the sheets so that the longitudinal joints (joints of profiled edges) are perpendicular to the walls with window or door openings. In this case, the joints will be less noticeable. But if you have a huge room, it is better to do the opposite - caulking transverse (not profiled) joints is much more troublesome.
Make a marking so that the number of joints of sheets and waste plasterboard was minimal. Besides, try to ensure the symmetrical location of whole sheets.
At the doorways, window openings, and niches, join the drywall sheets only with profiled edges. In this way, you can speed up and facilitate the work of further finishing.
Leave a 5-15 mm wide expansion gap when leveling the walls between the bottom of the sheet and the floor. Subsequently, you will cover the gap with a skirting board.
When you mark the walls with a level or bob (easier - with a bob), identify the surface's most protruding areas. At these points, transfer the marks to the floor. If you will end up with a rectangular room, draw a straight line through one of the marks so that the line is the outline of the rectangle, and all other marks are between the line and the existing wall. This process can be pretty time-consuming. You will have to remember a few simple rules from the elementary school geometry textbook (and in between, be surprised that it turns out that not everything you learned at school is useless).
Not everything you were taught in school is useless!
Yes, determining the angles at the joints of uneven walls school square, or even a construction square will not be enough. If you want to align the wall, then draw a line between the two most protruding marks. Now you need to draw a second line parallel to the first, at a distance of 5 mm + the gypsum board's thickness. This second line will be the contour of the new wall. Transfer the second line with a plumb line to the ceiling.
The principle of marking on the ceiling is more straightforward. Determine the lowest point of the existing ceiling. As a rule, you will find this point approximately in the middle of the room. From this point, transfer marks with the help of a level and string to the walls. From the resulting mark, step back 5 mm + the thickness of the gypsum plasterboard.
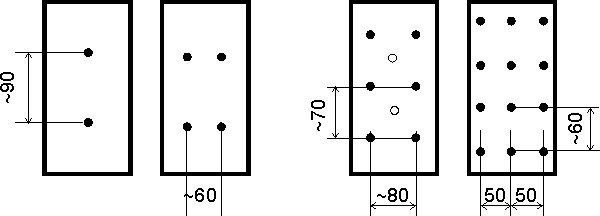
For more excellent reliability, secure the drywall sheets to the surface with screws or self-tapping screws, especially for ceilings. Make holes in the drywall sheets and the walls or ceiling before you start gluing the sheets. Usually, there are 2-4 holes per sheet for extra secure wall attachment and 6-12 holes for ceiling attachment. Visually it looks like this:
Wall Ceiling
Before gluing the drywall sheets, you must first prepare the glue to decide on the method of fixing the drywall sheets.
Glue preparation
To mix the glue, fill a container with about 1/3 of cold water—the warmer the water, the faster the gypsum sets. Add dry mixture and stir until smooth without lumps. You can use a powerful electric drill with a mixer with a diameter of at least 100 mm for mixing. Let the solution stand for 4-6 minutes and mix again.
Gluing methods.
You can glue plasterboard sheets in 2 ways:
- With sheet support on furring strips
Usually, make 4-6 furring strips for one drywall sheet. Don't glue the sheet to the furring strips. But instead, press tightly. Besides, there are usually holes next to the furring strips for additional fastening of the drywall sheet. It looks like the scheme above.
In order to make furring strips, apply drywall glue and level the surface of the furring strips with a spatula so that it is in the plane of the future wall minus the thickness of the drywall sheet and minus another 1-2 mm. The lines on the floor and on the ceiling will help you determine where this plane is. After the glue sets (hardens), process the surface of the furring strips, if necessary, with a spatula again (or grind it if more than 24 hours have passed since the application of the glue), so that the surfaces of all furring strips are in the same required plane.
2. Without furring strips
If the walls or ceiling are not very crooked, then you can do without furring strips. This will shorten the repair time by several hours. Nevertheless, in order to perform work in this way, it is desirable to have some experience in gluing drywall sheets.
Gluing drywall sheets
Apply blotches of drywall glue with a size of at least 90X90 mm to the surface to be finished, and in places where the edges of the sheet will adjoin the surface, a continuous layer of solution 60-80 mm wide as shown in the figure (the distance between the centers of the blotches is 20-30 cm, the picture shows blotches every 20 cm):
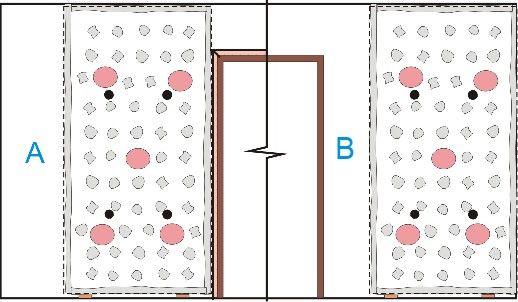
Furring strips are shown in brick color, holes for additional fastening are in black, plywood plasterboard linings are orange, and the door frame is brown. If you are going to make a door jamb, then the sticker should be made from the future jamb's edge (according to option A). If your door frame is so wide that you can glue a drywall sheet flush with the box, then you should glue the first sheet should according to option B.
The surface of blotches should "protrude" beyond the projected surface area by 1.5-2 cm minus the drywall sheet's thickness to ensure tight contact when gluing the sheets. The surface of a continuous layer of mortar should extend beyond the projected surface area by 0.3-0.8 cm minus the gypsum plasterboard's thickness. The total area of blotches should be at least 10-15% of the glued drywall sheet area, but the more, the better, as it makes it more durable. Same technic you can use for walls and ceilings.
Place the plasterboard on the surface to be finished. If you are gluing the sheets to the wall, then line the sheet edge under the bottom with wood strips, scraps of plywood, or other material with a thickness of 0.5-15 cm to ensure the verticality of the sheet in all planes, and at the same time to comply with the expansion joint.
Press the sheet to the surface firmly if there are furring strips and carefully if there are no strips. Screw the sheet to the surface at the additional attachment points. Do not tighten the screws or self-tapping screws right away. You will be able to do this later when you have accurately aligned the sheet. To screw the sheets, you can use a powered screwdriver, a drill with a screw attachment, or a crosshead screwdriver.
Check the verticality or horizontalness of the resulting surface using the marks on the floor and the ceiling and using a level. Press the sheet closer to the surface where it protrudes beyond the design plane. To press the sheet more tightly, you can lightly tap on the sheet with an open palm, in extreme cases with a rubber mallet, but do this very carefully, as you can break the sheet. After the gypsum plasterboard is placed in the design plane, carefully tighten the screws or self-tapping screws with a screwdriver in the places of additional fasteners. Please do not overdo it. If the sheet bends at the location of another attachment, you will not be able to bend it back. You will have to putty the resulting hole.
When gluing drywall sheets to the ceiling, you can additionally use props. If you do not attach an additional plasterboard sheet, then braces are required. The mounts are removed 2 hours after the plasterboard is applied.
The better you expose the first sheet, the easier and faster the remaining sheets' assembly will be. The technology for mounting the rest of the sheets is the same. Place the next drywall sheet against the edge of the first exposed sheet so that there is no gap, or the gap between the two sheets is no more than 2-5 mm.
Jamb finishing.
There are three ways to glue drywall to the surface of the walls in the places of niches, door, and window openings:
1. On the backside, make a deep undercut of 6-8 mm and bend carefully. The cardboard on the front side should remain intact, then glue the resulting blank. The disadvantages of this method are that you need a very accurate geometric calculation and accuracy of execution. Finishing slopes in other ways is much easier but requires additional work to level the surface in the joint area.
2. Only join the drywall's profiled edges so that later on, without any problems, fix the perforated corner at the joint.
3. You can join as you have to, and then at the next stage of finishing, seal the joint with a perforated corner, pre-cut the front part's cardboard. You can not cut the cardboard, but then the surface will not be completely flat.
If everything worked out fine and nothing fell off, then it's time to putty.
